In this blog, we will discuss how you can add more features in addition to the 8 features that come out of the box when using Cryptolens and our software licensing system. You will also learn how to create feature hierarchies.
This guide is also available as a video tutorial in case you prefer to take in information that way:
The first step is to sign in to Cryptolens and bring up the Product Page. Once you have created a product and a license key, you may already be aware that you can click on the license key to enable or disable up to 8 features.
Let’s suppose that you’d like to add feature 9, or even define a feature hierarchy where you create a module with multiple sub-modules. This can easily be done using Feature Templates, which are described in more detail in our documentation.
Multiple Features Without Hierarchy
The example listed below allows you to add additional features without defining any feature hierarchy.
["ModuleA", "ModuleB", "ModuleC"]You may change the name and the number of new features in the code to suit your needs. If you do not wish to make any changes, simply copy the code above and head back to the Product Page on the Cryptolens dashboard. Click on “Edit Feature Names”.
Scroll down to find the Feature Template field, and paste the copied or modified code into that field. Press the Save button and go back to the Product Page. When you press a license key, the new features will now appear below the original 8 features. The end result is shown below.

Multiple Features With Hierarchy
Let’s now suppose that you would like to add a sub-module to a particular feature. In this example, you will learn how to create two sub-modules for Module B, but the same logic can be applied to define whatever hierarchy suits your needs the best.
This section begins after the above-mentioned one ends, so if you have not already, please begin with the steps mentioned above regarding “Multiple Features Without Hierarchy”.
Head back to your Product Page on the Cryptolens Dashboard and press “Edit Feature Names”. Scroll down to the Feature Template field to find the code you pasted earlier. To define feature hierarchies, you will have to modify this code slightly.
The following code shows how to create two sub-modules for Module B. Simply replace “ModuleB” from the code in the Feature Template field with the following code:
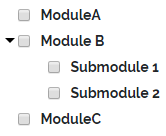
["Module B", ["Submodule 1", "Submodule 2"]]As you can see, the first element in the list is the name of the main feature, and the following elements will be the associated sub-modules. Using the same logic, you can define whatever feature hierarchy suits your needs. Keep in mind that you also can define sub-sub-modules.
The following code shows the end result if you just want to make three new features, whereas Module B has two sub-modules:
["ModuleA", ["Module B", ["Submodule 1", "Submodule 2"]] , "ModuleC"]When you have created your desired hierarchy, hit Save, go back to the Product Page, and click on the license key. You will now see additional features listed below the original 8, with the hierarchy you have defined.
Below you will find what the hierarchy looks like from our example.
If you have any questions, please reach out to us at [email protected].