Tag: software licensing solution

License templates for frequently used license configurations

To make it easier to create licenses of a common type, we have introduced a new feature called license template. In short, it’s a way to save license configurations (eg. features, set time, maximum number of machines) so that they can be re-used later.

It’s quite easy to get started. To save a license configuration, you can click on Save as Template button on the key creation page. This will re-direct you to a new page where you can provide a name for that configuration. Next time you want to generate a license from this configuration you can select it in the drop down list and click on Create button next to it.

We are always happy to hear your feedback or help you in case you have any questions 🙂

Support for any number of features

A common request we have received from our customers is to support more than 8 features. Until now, the recommended approach has been to use the notes field or data object fields to store any additional feature information. With this update, the dashboard and several of our clients have built in support for additional features.

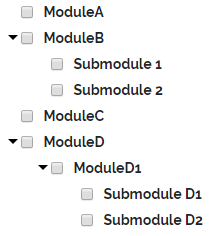
In addition to being able to define any number of features, we have also made it possible to define feature hierarchies. For example, we can define the following feature hierarchy:

Now, suppose the user opens ModuleB. With the above setup, we can either check if they have permission to use ModuleB or we can be more specific and require Submodule 1 to be present.

We will go through in more detail how you can get started later in the article. The feature template used for our above example is shown below:

["ModuleA", ["ModuleB", ["Submodule 1", "Submodule 2"]], "ModuleC", ["ModuleD", ["ModuleD1", ["Submodule D1", "Submodule D2"]]]]

Set up

Defining features

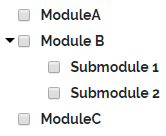
Let’s suppose we want to define the following feature hierarchy:

To define it, we can use a JSON array structure shown below:

["ModuleA", "ModuleB", "ModuleC"]

Suppose now that we want to add sub features to ModuleB. For example, Submodule 1 and Submodule 2. To do that, we introduce a new array instead of the string “Module B”, which has the following structure:

["Module B", ["Submodule 1", "Submodule 2"]]

The first element defines name of the module, and the second element should ways be a list of submodules.

We can keep adding submodules to submodules in a similar fashion.

To add your feature template to a product, you can click on Edit Feature Names on the product page and then scroll down until you see Feature Template.

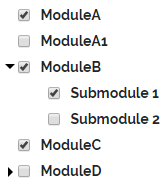
In the example above, we would get the following feature hierarchy

It’s defined with the following feature template

["ModuleA", ["ModuleB", ["Submodule 1", "Submodule 2"]], "ModuleC"]

Assigning features

Once you have defined the feature template, the page to create a new license key and to edit existing one will have a box that allows you to define them, as shown below. The state will be stored in a data object with the name cryptolens_features, which we will cover in the next step.

Verifying features

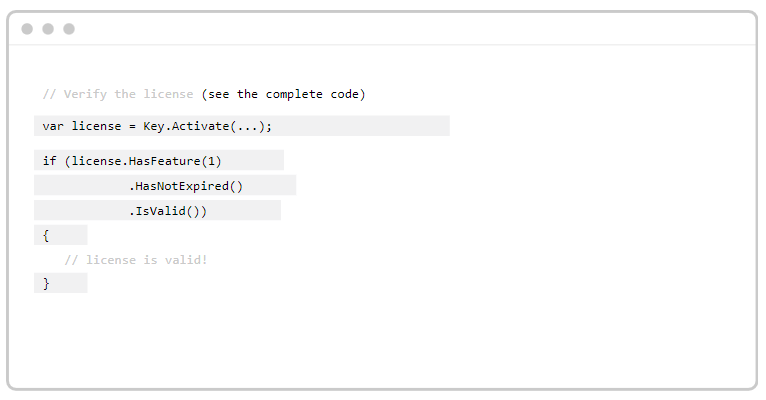
At the time of writing, the Java client supports checking these additional features out of the box. You can do that using a special version of Helpers.HasFeature() method. For example, to check if Submodule1 is present, you can type

Helpers.HasFeature(license, "ModuleB.Submodule 1")

If you only want to check if ModuleB is present, without being specific, you can insteadwrite

Helpers.HasFeature(license, "ModuleB")

Plan ahead

Support for additional features is a fairly new feature so we would be grateful if you could report any errors or suggestions to us. At the time of writing, the Java client supports this out of the box. We plan to ship this to our other client libraries, starting with .NET. If you would like us to focus on a specific client library, please let us know.

As always, let us know if you have any questions 🙂

Analytics of feature usage

Cryptolens offers different ways to analyse usage data. The standard analytics portal uses information generated when licenses are verified, which allows you to get insights where your users are located, when they use the application, etc.

There also an option to send in more data, which will give better insights about how different modules are used. We will cover this in this post.

Sending in data

To register an event, you can call the RegisterEvent method. Most of the parameters are optional, but it’s useful to at least supply a FeatureName and either Key or MachineCode. If you just have one product, ProductId is not necessary, but it’s useful if you have multiple products.

Cryptolens always needs to be able to link usage data to a unique user to give better results. The code snippet below can be used to register event, in our case that the user started YearReportGenerator module.

AI.RegisterEvent("access token with RegisterEvent permission", 
    new RegisterEventModel { EventName = "start", FeatureName = "YearReportGenerator", Key= "AAAA-BBBB-CCCC-DDDD", MachineCode = Helpers.GetMachineCode(), ProductId = 3 });

If you are using any other environment, the same can be accomplished with with a GET request as follows:

https://app.cryptolens.io/api/ai/RegisterEvent?token=<access token with RegisterEvent permission>&Value=30&Currency=USD&ProductId=3&MachineCode=<machine code>

More details about what information can be sent is available here.

Retrieving data

If you would like to analyse the data yourself, you can use GetEvents method to retrieve it. However, it’s also possible to get visual representation on the this page. The GUI is continuously improved, so if you have any feedback, you are more than welcome to get in touch. Below are several screenshots. The first image shows the summary of all the features:

The second image below shows event distribution:

Node.js software licensing

Today we have released a client library for Node.js, which can be installed quite easily using the command below:

npm install cryptolens

Once it’s installed, you can verify a license key using the code below:

const Key = require('cryptolens').Key;

var RSAPubKey = "{Your RSA Public key, which can be found here: https://app.cryptolens.io/User/Security}";
var result = Key.Activate(token="{Access token with with Activate permission}", RSAPubKey, ProductId=3349, Key="GEBNC-WZZJD-VJIHG-GCMVD", MachineCode="test");

result.then(function(license) {
    if (!license) {
        // failure
        return;
    }
    
    // Please see https://app.cryptolens.io/docs/api/v3/model/LicenseKey for a complete list of parameters.
    console.log(license.Created);
});

If you want to load a license key (eg. for offline activation), you can use LoadFromString method available in the Helpers namespace. You can read more about it here.

Disclaimer: this is not an April joke, we support Node.js for real 🙂

Golang software licensing

Today, we have released a library for Golang, freely available on GitHub. It supports both key verification and offline verification. To verify a license key, the code below can be used:

token := "Access token"
publicKey := "RSA Public key"

licenseKey, err := cryptolens.KeyActivate(token, cryptolens.KeyActivateArguments{
	ProductId:   3646,
	Key:         "MPDWY-PQAOW-FKSCH-SGAAU",
	MachineCode: "289jf2afs3",
})
if err != nil || !licenseKey.HasValidSignature(publicKey) {
	fmt.Println("License key activation failed!")
	return
}

More examples can be found here.

Unity Software Licensing

Unity is a powerful cross-platform game engine. Since it uses C# as the scripting language, we can easily integrate it with Cryptolens client library. In this post, we explain how you can add license key verification into a Unity game and briefly cover payment integration.

Adding software licensing

  1. Download the binaries (please pick those without “System.Management”).
  2. Place these binaries into “Assets” folder.
  3. Add code from the key verification tutorial.

A sample Unity project can be found here.

Adding payments

Once licensing is in place, the next step is to add payment integration. Since Cryptolens is cloud-based, you can easily integrate it with your own billing system or use our existing integrations with popular platforms such as Stripe and PayPal. You can read more about how this can be accomplished here.

Please feel free to reach out should you have any questions!

Automating offline activations

Many times your customers may have either restricted internet access or no internet access at all. Although Cryptolens is a cloud-based licensing solution, you can still use it to protect offline devices. In this post, we cover three ways internet access can be restricted and how license key verification can be performed.

Periodic internet access

If your users are connected to the internet on a regular basis, we can cache the response from the “Activate” method each time we are able to contact the server. If, at some point, internet connection would not be present, we would fallback on a cached version of the license object.

When using this approach, it’s important to define how long time your users can be offline. There is a field called “SignDate” in the license key object, which is the time when the response was signed by the server (i.e. the last time you successfully called Activate). So, if you only want to allow your users to be offline for 30 days, you can compare the current date with the “SignDate”.

License server (re-routing)

If your users have certain devices that have no direct internet access, one option is to use a license server, which will re-route all requests through a server hosted by the user. Only the server has internet access.

There is currently a Windows version of the server, freely available on GitHub.

Air gap (no internet)

If the devices have no internet access at all, we can use a similar idea that was described in periodic internet access, with the only difference that we always fallback on the license file.

In Cryptolens, there are three ways you can create such a file:

In the dashboard

Next to each license key, there is a yellow button which can be used to create license files:

Using activation forms

Activation forms allow your customers to download activation files themselves.

Using the API

If you want to automate license file creation, you can either call the Activate method using one of our client APIs or call the Web API directly (eg. using curl).

Floating licenses in Java

Floating licenses makes it easier for your customers to switch between machines that actively run your software, without having to deactivate them first. For instance, you can constrain the number of concurrent users to 10, but still allow the software to be installed on eg. 100 computers.

In Cryptolens, floating licensing works by letting your app to regularly poll the server to check if the number of concurrent users has been exceeded, which can be accomplished with the code snippet below:

import io.cryptolens.methods.*;
import io.cryptolens.models.*;

public static void main(String args[]) {
    String RSAPubKey = "RSA Public Key";
    String auth = "Access token";

    LicenseKey license = Key.Activate(auth, RSAPubKey, new ActivateModel(3349, "MTMPW-VZERP-JZVNZ-SCPZM", Helpers.GetMachineCode(), 300, 1));
    if (license == null || !Helpers.IsOnRightMachine(license, true, true)) {
        System.out.println("The license does not work.");
    } else {
        System.out.println("The license is valid!");
        System.out.println("It will expire: " + license.Expires);
    }
}

Normally, if the app stops polling the server, that user will be automatically deactivated within the specified period of time. However, if you want to deactivate it instantly, you can use the code below:

import io.cryptolens.methods.*;
import io.cryptolens.models.*;

public static void main(String args[]) {
    String auth = "";

    boolean result = Key.Deactivate(auth, new DeactivateModel(3349, "MTMPW-VZERP-JZVNZ-SCPZM", Helpers.GetMachineCode(), true));
    if (result == true) {
        System.out.println("Deactivation successful.");
    } else {
        System.out.println("Deactivation failed.");
    }
}

To see all the required parameters, please check out the GitHub repo of the Java client. Should you have any questions, please feel free to reach out.

Protect Java code with software licensing

Today, we have released an update to the Java client API that allows you to easily verify license keys. You can read more about how to add it to your project in the GitHub repo. Below is an example of the code that you can use in your application.

import io.cryptolens.Cryptolens;
import io.cryptolens.Helpers;
import io.cryptolens.LicenseKey;

public class Main {

    public static void main(String[] args) {
        String RSAPubKey = "<RSAKeyValue><Modulus>sGbvxwdlDbqFXOMlVUnAF5ew0t0WpPW7rFpI5jHQOFkht/326dvh7t74RYeMpjy357NljouhpTLA3a6idnn4j6c3jmPWBkjZndGsPL4Bqm+fwE48nKpGPjkj4q/yzT4tHXBTyvaBjA8bVoCTnu+LiC4XEaLZRThGzIn5KQXKCigg6tQRy0GXE13XYFVz/x1mjFbT9/7dS8p85n8BuwlY5JvuBIQkKhuCNFfrUxBWyu87CFnXWjIupCD2VO/GbxaCvzrRjLZjAngLCMtZbYBALksqGPgTUN7ZM24XbPWyLtKPaXF2i4XRR9u6eTj5BfnLbKAU5PIVfjIS+vNYYogteQ==</Modulus><Exponent>AQAB</Exponent></RSAKeyValue>";

        Cryptolens cryptolens = Cryptolens.getDefault();
        cryptolens.setRSAPublicKey(RSAPubKey);

        Cryptolens.ActivateResponse response =
                cryptolens.activate( "WyIyNTk1IiwidVVrQm94OGlYS3pHZlhTc0x6Rm9mN1piektrT0FSd0REaFZ0ZXZJMSJd"
                        , 3349
                        , "ICVLD-VVSZR-ZTICT-YKGXL"
                        , Helpers.GetMachineCode()
                );

        if (!response.successful()) {
            System.out.println("Failed to activate!");
            Cryptolens.ActivateServerError er = response.getServerError();
            Exception ex = response.getException();

            if (er != null) {
                System.out.println("Server error: " + er);
            }

            if (ex != null) {
                ex.printStackTrace(System.out);
            }

            return;
        }

        LicenseKey licenseKey = response.getLicenseKey();

        System.out.println("Activation was successful!");
        System.out.println(licenseKey.getKey());
        System.out.println(licenseKey.getF1());
    }
}

Python code for software licensing

Update 2019-12-04: We have updated the Python library so that it’s easier to obfuscate. Please check out the latest article with tips on monetizing Python applications (it covers code obfuscation, license verification and accepting payments).

Today, we released a library for license key verification in Python, freely available on GitHub. The code below checks license validity with the server (performing all the necessary cryptographic checks under the hood). Please run “pip install licensing” before running the code below.

from licensing.helpers import Helpers
from licensing.models import Response, RSAPublicKey
from licensing.methods import Key

pubKey = "<RSAKeyValue><Modulus>sGbvxwdlDbqFXOMlVUnAF5ew0t0WpPW7rFpI5jHQOFkht/326dvh7t74RYeMpjy357NljouhpTLA3a6idnn4j6c3jmPWBkjZndGsPL4Bqm+fwE48nKpGPjkj4q/yzT4tHXBTyvaBjA8bVoCTnu+LiC4XEaLZRThGzIn5KQXKCigg6tQRy0GXE13XYFVz/x1mjFbT9/7dS8p85n8BuwlY5JvuBIQkKhuCNFfrUxBWyu87CFnXWjIupCD2VO/GbxaCvzrRjLZjAngLCMtZbYBALksqGPgTUN7ZM24XbPWyLtKPaXF2i4XRR9u6eTj5BfnLbKAU5PIVfjIS+vNYYogteQ==</Modulus><Exponent>AQAB</Exponent></RSAKeyValue>"

res = Key.activate(token="WyIyNTU1IiwiRjdZZTB4RmtuTVcrQlNqcSszbmFMMHB3aWFJTlBsWW1Mbm9raVFyRyJd",\
                   rsa_pub_key=pubKey,\
                   product_id=3349, key="ICVLD-VVSZR-ZTICT-YKGXL", machine_code="test")

if res[0] == None:
    print("An error occured: {0}".format(res[1]))
else:
    print("Success")

You can find more information the parameters, etc here.