Software Licensing System – Why More Developers Should Care
Are you working on a software application that you one day want to sell? Then you need to think about software licensing early on. No, I am not talking about End-User License Agreements (EULA) or legal documents, I am talking about a software licensing system – the system that ensures that only customers get access to the application.
Why is a software licensing system so important? Because without it, you simply cannot sell a software application to customers.
In this blog, I will briefly, and in a non-technical, way describe what a software licensing system really is, and how it can enable you to take your software passion and turn it into a business.
We have also made a YouTube video about this blog if you prefer to watch rather than read (like me).
What is a software licensing system?
To make this blog a bit more fun, picture the following analogy. Let’s say that your software application is like a house. The different rooms of the house are the different features in your application. One room can house the most basic features, and another room can house more advanced functionality.
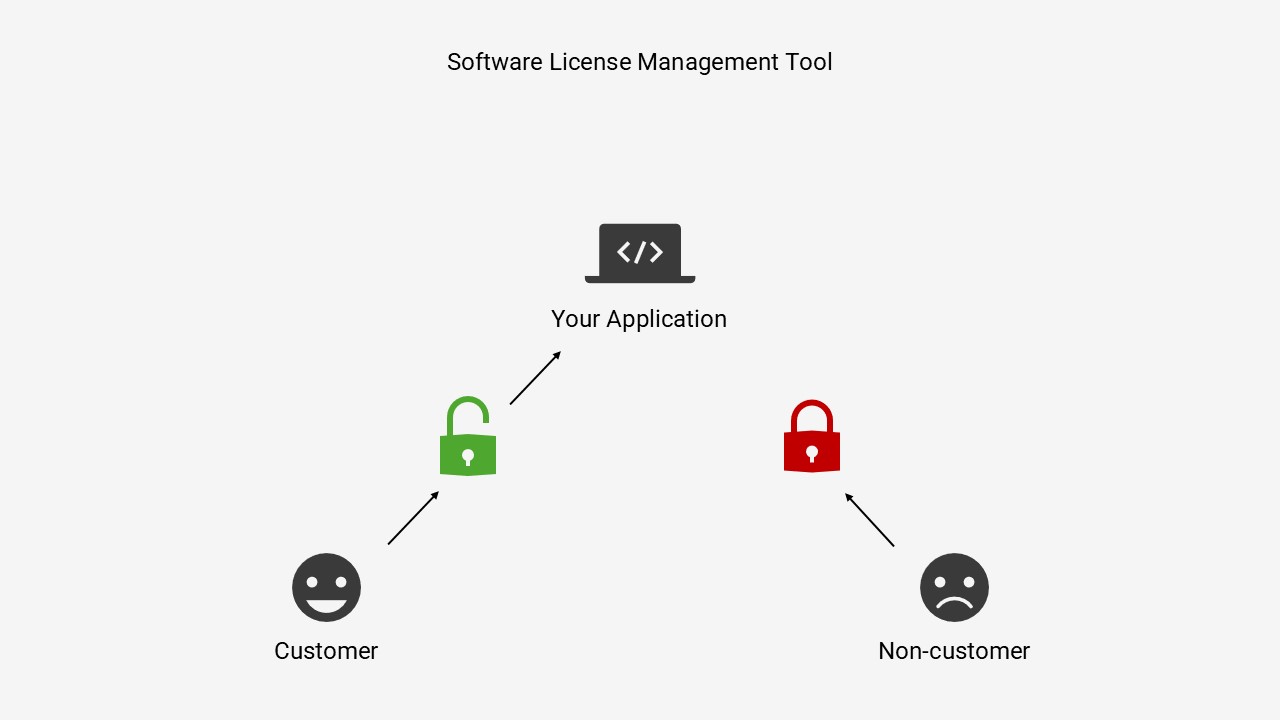
Without software licensing, your application does not have any locks. Users can enter whatever room they feel like without paying at all! It becomes clear that no one would ever pay for such a product, since everyone can just use it without paying.
A software licensing system would establish a lock on the front door, making sure that only people with a key can access your application.
How does this system work in practice? That is a great question! So great that we will cover it fully in a future blog post. For now, let us just assume that the system indeed works as it should.
Software licensing performs key verification
The next step for us is then to create keys for the front door and give them to our customers when their payment has gone through. In software licensing terms, that key is a digital license key that is unique to each customer.
So what happens when a customer tries to enter our application? In the most basic setup, they will be greeted by a locked front door. After providing their license key, the software licensing system checks so that their license key is valid, and if it is, the door is unlocked and the customer can begin to use the application.
The customer can then leave the application, and the key verification process is repeated whenever they try to run the application once more.
If a non-customer tries to access the application, they will be greeted by the same locked front door. Without a key, they cannot enter!
Some software applications choose to charge a customer a subscription fee. Monthly or yearly subscription fees are the most common ones. Then it can be useful to block the license key of customers who stop paying their fee. If such a customer, or ex-customer, tries to use the application, they will not be let in. That is because their license key stopped being valid when they stopped paying.
Charge extra for more features
Now you know the basic setup, but what about the different rooms I mentioned earlier? Let’s suppose that the house has two rooms, one with basic features, and one with more advanced functionalities.
It is sometimes beneficial to charge customers extra for using the more advanced features. You can then create two different types of license keys for the different rooms. A green license could, for example, cost $100 and give customers access to the basic features of your application. A red license could instead cost $500 and give customers access to all of the features in your application.
The moral of the story
So that’s it, right? Is software licensing really that simple?
Of course, it isn’t. But we hope that the simple analogy gave you an introduction to software licensing and how it enables you to sell a software application.
But remember – although a software licensing system enables you to sell your application, it alone can never make your application good enough for customers to want to buy it.
That is something only you have the power to do.
Thank you for reading, stay curious!