This blog features a convenient way of speeding up license creation using license templates in Cryptolens. Issuing multiple licenses with the same expiry date and enabled features can speed up the license creation process and make your work easier.
If you would rather watch a YouTube video of this guide, please watch the following video:
The feature covered in this blog is called License Templates, and you can read the full documentation here.
License Templates tutorial
Start by signing in to Cryptolens, and go to the product you want to create a license template for. Click on “Create a new key” like you normally do to issue a license manually.
Select the features and the expiry date that you want. Instead of clicking on Create, you should click on Save as Template.
Give the license template a name. Notice that the “Parameters” field is already filled out. If you want to customize the parameters of your license template, please read the existing documentation.
When you are done customizing your template, click on Create.
Go back to the product and click on “Create a new key”. You should now be able to see the license template you created in the field called “License Templates”.
To make a new license with the same features and expiry date as you selected for the license template, simply select your newly created license template in that field, and click on the Create button to the right of the drop-down menu.
Know you now more about speeding up license creation using license templates in Cryptolens. This method is useful if you, for example, want to issue multiple yearly or monthly licenses with the same features. It is also possible to retrieve the license templates through the API if you prefer to use the API for license creation.
Thank you for reading this blog, please reach out to us if you have any questions!
Not a customer yet? Sign Up for a free trial and implement our software licensing system within minutes.
In this blog, we will cover how you can automatically notify customers at license expiration in Cryptolens. You will be able to select time intervals for the emails and choose to send a copy to your own email as well.
We have also uploaded this guide as a video if you find that more convenient:
This guide is based on a page in our documentation that you can find here.
Setting up automatic expiration emails
Sign in to Cryptolens and head to the Product Page. For an existing product, click on “Edit Features” and scroll down. Click on the checkbox called “Automatic expiration notification” and then click on Save.
You have enabled the feature, but you need to specify which licenses are time-limited. Do this in one of these two ways:
You can designate a particular feature to be the time-limited feature, meaning that any license with that particular feature set as true will be treated as time-limited.
You can treat all licenses for your selected product as time-limited.
1: To designate a particular feature to be time-limited, simply select the “Time Limited” option in the drop-down menu for a particular feature’s “Type”, which can be found at the top of the Edit Feature Names page. Enable the chosen feature for the licenses you want to send email notifications to. Click on Save.
2: Click on the checkbox below the list of features near the top of the Edit Features Names page called “Treat all licenses as time-limited”. Click on Save.
Now that Cryptolens knows which licenses are time-limited, your customers will receive 3 email notifications, one 7 days in advance, one 3 days in advance, and one on the day that the license expires.
Customizing the time intervals
You can customize when to send the emails and how many to send. To do this, head to the Product Page once again, and click on Data Objects.
cryptolens_expirationnotice
Copy the object name above and paste it into the field called “Name”.
By default, the string value is 0,3,7, meaning that an email will be sent 0 days prior, 3 days prior, and 7 days prior to the license expiration date. Simply change this string value to whatever time intervals you want. If you want to send more emails, just add a comma (,) and specify how many days prior to license expiration you want to send an email. For example, to send an extra email 10 days in advance, simply modify the string to be 0,3,7,10. Press on Create when you have chosen your preferred time intervals.
Sending a copy to your own email address
Stay on the Data Objects page to set it up so that you receive a copy of the email sent to customers.
cryptolens_expirationnotice_send_copy
Copy the data name above and paste it into the Name field. Provide the email to which you want the copy sent in the String Value field. Press on Create.
Now you know how to automatically notify customers at license expiration in Cryptolens.
In this blog, we will discuss how you can add more features in addition to the 8 features that come out of the box when using Cryptolens and our software licensing system. You will also learn how to create feature hierarchies.
This guide is also available as a video tutorial in case you prefer to take in information that way:
The first step is to sign in to Cryptolens and bring up the Product Page. Once you have created a product and a license key, you may already be aware that you can click on the license key to enable or disable up to 8 features.
Let’s suppose that you’d like to add feature 9, or even define a feature hierarchy where you create a module with multiple sub-modules. This can easily be done using Feature Templates, which are described in more detail in our documentation.
Multiple Features Without Hierarchy
The example listed below allows you to add additional features without defining any feature hierarchy.
["ModuleA", "ModuleB", "ModuleC"]
You may change the name and the number of new features in the code to suit your needs. If you do not wish to make any changes, simply copy the code above and head back to the Product Page on the Cryptolens dashboard. Click on “Edit Feature Names”.
Scroll down to find the Feature Template field, and paste the copied or modified code into that field. Press the Save button and go back to the Product Page. When you press a license key, the new features will now appear below the original 8 features. The end result is shown below.
Multiple Features With Hierarchy
Let’s now suppose that you would like to add a sub-module to a particular feature. In this example, you will learn how to create two sub-modules for Module B, but the same logic can be applied to define whatever hierarchy suits your needs the best.
This section begins after the above-mentioned one ends, so if you have not already, please begin with the steps mentioned above regarding “Multiple Features Without Hierarchy”.
Head back to your Product Page on the Cryptolens Dashboard and press “Edit Feature Names”. Scroll down to the Feature Template field to find the code you pasted earlier. To define feature hierarchies, you will have to modify this code slightly.
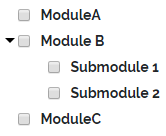
The following code shows how to create two sub-modules for Module B. Simply replace “ModuleB” from the code in the Feature Template field with the following code:
["Module B", ["Submodule 1", "Submodule 2"]]
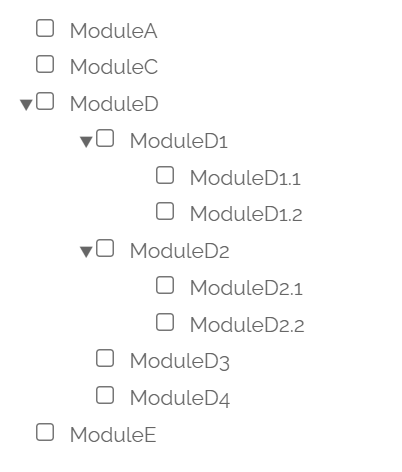
As you can see, the first element in the list is the name of the main feature, and the following elements will be the associated sub-modules. Using the same logic, you can define whatever feature hierarchy suits your needs. Keep in mind that you also can define sub-sub-modules.
The following code shows the end result if you just want to make three new features, whereas Module B has two sub-modules:
When you have created your desired hierarchy, hit Save, go back to the Product Page, and click on the license key. You will now see additional features listed below the original 8, with the hierarchy you have defined.
Below you will find what the hierarchy looks like from our example.
If you have any questions, please reach out to us at [email protected].
As you grow your product offering, a challenge that can arise is how to differentiate between different products, and, at the same time, offer a seamless experience to your customers. We will present two approaches that can be used in Cryptolens and outline best practises when implementing license key verification in a product with multiple modules.
Using one license for multiple products
With this approach, the information about your products/modules is stored within one license key. In other words, you would just need to create one product in the Cryptolens dashboard. To differentiate between your products, you could either use the pre-defined features (F1 to F8) or define a more detailed feature hierarchy using feature templates.
This approach tends to work in most cases. However, in some cases it is still more desirable to be able to issue separate license keys for each product or module. We will describe this approach in the next section.
Separate license key per product bundled in a master license
If the previous approach is not an option, another way is to create one Cryptolens product per product/module. Typically the reason why this approach is more desirable is that it allows you to have separate trials or subscriptions attached to each license. For example, let’s suppose you have a product that offers additional features that are not part of the main product. By using a separate license key for the additional features or sub-products, you could allow your clients to test them out independently.
However, this approach would mean that your customers will need to keep track of multiple licenses at once. To solve this, we recently released an update to the API and the customer object. From now on, assuming that licenses are linked to the same customer, they can be retrieved using one API call using the customer secret.
Best practises when a product consists of independent modules
When a product is split up into independent modules, calling Key.Activate (a method used to verify a license with the server) each time a module starts is not optimal in most cases. Instead, a better approach is to verify the license with the server once at startup and then save the License Key object to file. Before another module is launched, it can check for existence of such file (and ensure that it is not too old) and then use it instead of calling the server. When it comes to obfuscation, it is more important to focus on obfuscating the method that loads the License Key object then the code that obtains the License Key object from the server.
If you have any questions, please feel free to reach out to us at [email protected].
Licensing software that will run in an offline environment is more challenging, specifically in cases where one needs a certain response from the server (for example, to activate a new devices or record usage). However, it tends to be a real problem when changes need to be recorded fast, which occurs in the floating license model and pay-per-use model).
A few days ago, we introduced support floating license that can work offline using our license server. Today, we would like to introduce the new release of the license server that supports the pay-per-use model offline.
How it works
Instead of contacting our server to record usage, the license server will, on a regular basis, write down all the updates to a data object to disk. Each time an update is written, we will use your public-key to encrypt it along with the previous encrypted block (if you want to learn more about how it works, please check out ‘asymmetric encryption’ in this article). Since the public key is used, there is no way to see what information has been recorded, and because each update is encrypted with the previous update, once it is on disk, there is no way to tamper with the usage (assuming the client has not backed up the previous version). And even if a client would be able to tamper with this file, it may still be detected by our AI anomaly detection module. In addition to the collection of usage information, if your clients send you these files regularly, you may be able to detect any tampering with their local clock.
Being able to find anomalies in software license logs can help you as a software vendor to detect whenever your customers experience problems (for example, with license verifications) or to detect other types of abnormal behaviour (for example, fraudulent usage).
As the amount of data increases, detecting anomalies becomes time-consuming and, in some cases, unfeasible.
To help you to find anomalies, we have released a new dashboard that will automatically let you know of any behaviour that does not conform to the norm.
How it works
The anomaly detection module works by learning the distribution of your historical data. Any group of samples that does not conform to the norm will be classified as an anomaly.
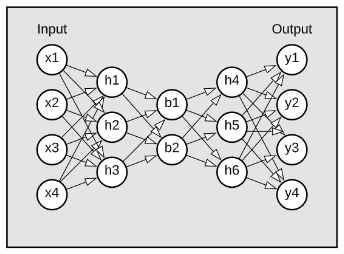
Under the hood, an autoencoder-based neural network is used (displayed below), where the goal is to train an identity function. Since there is a bottleneck layer in the middle, it forces the network to find a compressed representation of your data. As a result, it will succeed to find such representation for most of the samples. Those samples where the network struggles to find a compressed representation are classed as anomalies.
A sample can be classified as an anomaly either by its reconstruction loss (anomalies will have a higher reconstruction loss than normal samples) or by using the low-dimensional representation (the bottleneck layer) in a different method (for example, in a clustering method). In the first case, the challenge is to pick the right method to decide the decision boundary and in the latter to pick a clustering method that will be able to differentiate between normal samples and anomalies. You can read more about how it works in the following article.
Getting started
The anomaly detection module is can be accessed on the following page. It is continuously being updated, so if you notice anything or have any feedback, please reach out to us at [email protected].
Not a customer yet? Sign Up for a free trial and implement our software licensing system within minutes.
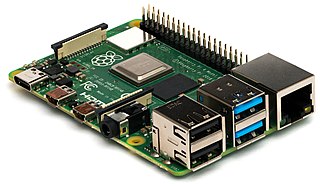
We are continuing our work on making the .NET SDK cross platform. In the latest release of our .NET library, we have added support for machine code computation on Raspberry Pi and improved the existing support for Linux.
Image of Raspberry Pi 4 Model B. Credits Michael Henzler. License CC BY-SA 4.0.
From a licensing perspective, being able to identify a device is important in order to make it possible to limit the number of end users that may use the same license. Treating a device id as an end user is very common, even though an end user can also be defined in other ways too (for example, to include the process id or username).
In that version of the library, both Helpers.GetMachineCode and Helpers.GetMachineCodePI work the same way. If you prefer to use the pre-compiled binaries, these can be obtained here. It’s important to use the ones in the “Without System.Management” folder.
How it works
Every Raspberry Pi board comes with a unique serial number. The updated methods first determine whether it is a Raspberry Pi board, and if it is, hash the serial number. The machine code is of the structure “RPI_{SHA256(serial number)}”. More technical information is available in the release notes.
In this post, we would like to share several new tools and practical tips that are tailored to those of you that sell to larger companies. We will cover the common issues such as management of large number of activations, offline access and reporting.
Recommended approach
When selling to larger companies, we recommend to issue one license key per client and keep track of the employees using activations. For those familiar with Flexera terminology, an activation is the same as a seat. There are two ways to restrict the number of active employees that you can your software:
Node-locked: in the node-locked model, once a device is activated, it needs to be manually deactivated if the customer wants to use that seat on a different machine.
Floating license: in this model, unused devices will automatically be deactivated when not in use, allowing your customers to install your application on any number of machines and use it concurrently on a limited number machines.
If you want to have different number of seats per feature, our recommendation is to issue a separate license per feature.
Managing activations
Typically, it’s more convenient to issue one license key per company and then restrict the number of end users (aka. machine codes/seats) to the number of workstations that will run the application. However, it can quickly become hard to manage all the end users, especially when employees leave and your customers want to free up unused seats.
To solve this problem, we have introduced the concept of “friendly name” and improved the license portal to allow your customers to query on it.
A friendly name is a way to add a human-readable name to each activated device, so that it is possible to tell which user it belongs to. Normally, machine codes are an unreadable string, and look similar to “9f86d081884c7d659a2feaa0c55ad015a3bf4f1b2b0b822cd15d6c15b0f00a08“. To make it easier to distinguish between these, you can add an optional paramater FriendlyName when activating/verifying a device. For example, if you have integrated our key verification script, you can add the friendly name as shown below:
var result = Key.Activate(token: auth, parameters: new ActivateModel()
{
    Key = licenseKey,
    ProductId = 3349,
    Sign = true,
    MachineCode = Helpers.GetMachineCode(),
    FriendlyName = Environment.MachineName
});
Our recommendation is to use Environment.MachineName as the friendly name, since if your customers use Active Directory, they will be able to see it in the admin dashboard:
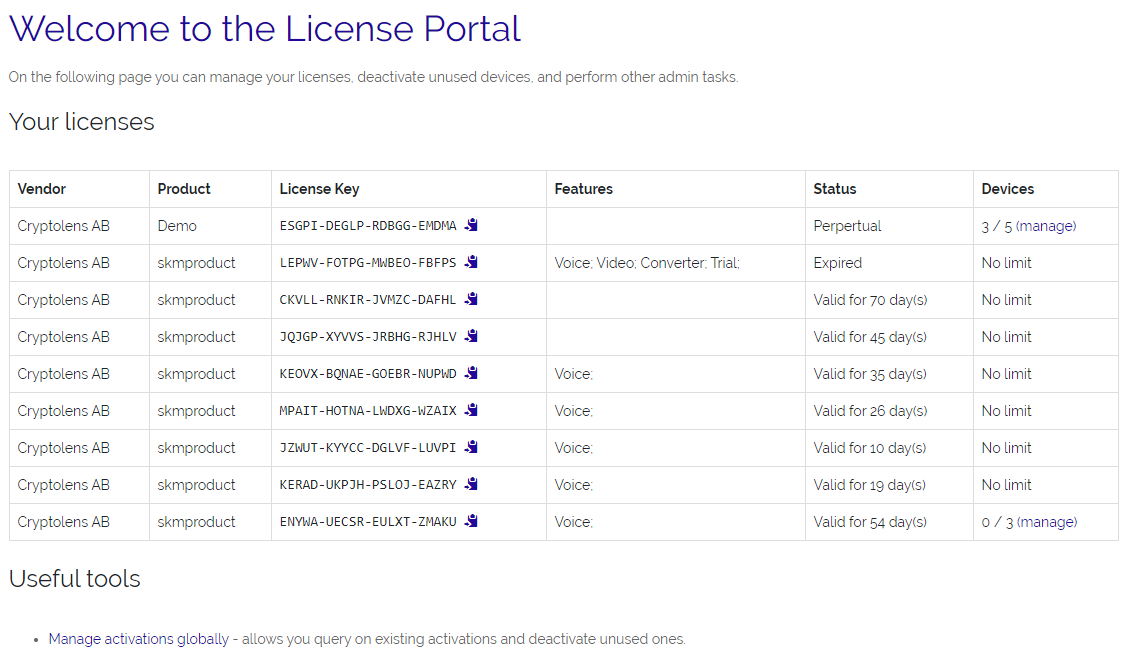
To make it easier for your customers to find unused devices and deactivate them, we have added new tools in the customer portal and a new permission to deactivate devices in the customer object. There’s also a new sign up link that you can use to allow your customers to sign up with deactivation permission.
Once they are logged in, they can click on the “manage licenses” tab, and they will see a pag similar to the one below:
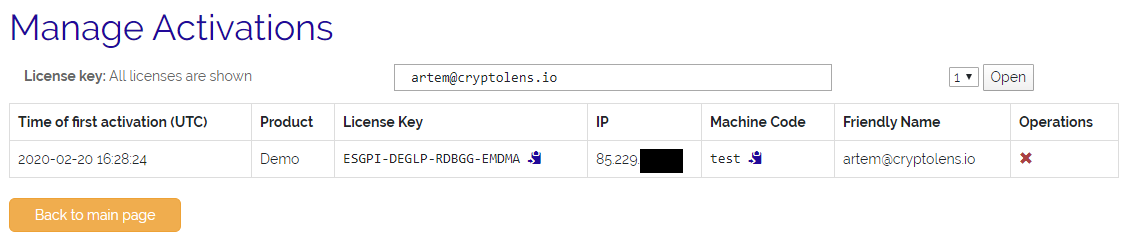
Here they can either manage all the activations/used seats and remove unused ones. For example, to find all my activations, the admin could click on “manage activations globally” and search for “artem(at)cryptolens.io”:
Offline access
Oftentimes, larger companies have strict constraints on internet connectivity. They may want to have their devices completely offline or without direct internet access. When your customer puts forward this constraint, our recommendation is to offer them to use our license server as a first step, which tends to be accepted in most cases. The idea behind the license server is to act as a reverse proxy, in other words, it allows devices on your customers’ network to communicate with Cryptolens through the license server, without the need of having a direct internet access by themselves. As a result, only the license server needs to be able to access the internet. Furthermore, your customers can restrict the internet access of the license server to only be able to access Cryptolens. Instead of having to do that for all their devices, they can focus on protecting one workstation running the license server. The license server is freely available on GitHub.
If your customers want to have their devices completely offline, you can use the idea of offline activation, by delivering the license file using eg. a USB stick. In simple terms: normally, when you call Key.Activate to verify a license key, you receive a signed JSON response that our client libraries convert into a language-specific object. For example, in .NET, it’s the LicenseKey object. Once you have this object you can check the status of the license, eg. features and expiration date. For devices that do not have the ability to call Key.Activate, you can instead send them the result from this method as a license file. The easiest way to enable your customers to receive these files on their own is by using our Activation Forms. Once they have provided the license key and machine code, a license file will be downloaded, which they can put on a USB stick, which is then used to activate the offline device. Under the hood, an activation form will call Key.Activate; in other words, if you want to control the user experience, you can create your own page that performs this call. Alternatively, you can manually create this file in the dashboard, by clicking on the yellow button next to the license key.
Reporting tools
Another important feature that your customers can request is to have access to audit logs. For example, if the use the floating license model, they might want to know how many seats are used at any one time so that they can scale it up or down. We are actively working on improving the customer portal to allow your customers to analyse their usage. At the time of writing, we have created standalone scripts on GitHub that you can use to generate several common reports. If you need to generate a specific report, please let us know and we will add example code.
Not a customer yet? Sign Up for a free trial and implement our software licensing system within minutes.
It is now possible to integrate your FastSpring store with Cryptolens. This integration allows you to automatically issue licenses to your customers upon a successful payment in your FastSpring store. You can read more on how to get started in the following tutorial.
Not a customer yet? Sign Up for a free trial and implement our software licensing system within minutes.
Since the end of last year, we have made the reseller portal generally available for all users. We would like to thank all our beta customers for their feedback during the development process.
Idea
The goal behind the reseller portal is to allow you to delegate license issuance rights to other users. This can be your resellers/distributors, IT-admins of your customers or your employees. In other words, “reseller” can be any user that should only be able to create specific amount of new licenses based on a pre-defined template.
The reseller portal also introduces new logging capabilities. All events related to new licenses, customers, etc, are stored in the object log. Thanks to this log, you can, for instance, bill your resellers or customers only when they have successfully created a new license.
Getting started
Once you have created a new account, the reseller portal will be available in the top menu. If you are an existing customer, you can enable it on the billing page. As the next step, we recommend to check out the wiki page for more information.
Please let us know if you have any questions 🙂
Not a customer yet? Sign Up for a free trial and implement our software licensing system within minutes.