The team at Cryptolens is exploring a new brand name and website – Devolens.
However, nothing will change in the way you currently use Cryptolens.
We are still the same team and we have not been acquired or merged.
The dashboard, your data, and your account will remain exactly the same.
You do not need to take any action.
What to expect
As a beginning step, we are only exploring the new name in the form of a new website, Devolens.com, with the same content as our current website. Our current website will still be fully accessible during the initial testing period.
Eventually, we plan to fully move the content such as the front page, product page, pricing page, and blog posts, from Cryptolens.io to Devolens.com. We will not change the pricing plans or anything else product-related.
We currently have no plans to change the subdomains app.cryptolens.io (our dashboard) and help.cryptolens.io (our documentation page), meaning that you as a customer will not be affected by the possible brand name change at all.
In essence, the plan is to change the company name to Devolens, but our software licensing product will still be called Cryptolens. This allows us to rebrand without changing anything on the technical side and you as the customer will not be affected at all for the foreseeable future.
We will keep you updated about the possible name change at every step of the process. If you have any questions, concerns, or feedback on the new name and website, please reach out to [email protected].
Q: Will pricing/features/support change? A: No, we are only planning to change the brand name and nothing on the product side.
Q: Will I have to switch websites and dashboards later? A: The plan is to change our main website from Cryptolens.io to Devolens.com. Thus, content such as the front page, product page, pricing page, and blog posts will be moved to Devolens.com. However, the dashboard app.cryptolens.io and the docs page help.cryptolens.io will be used for the foreseeable future.
Q: Will I have to change anything in my code? A: No. Our dashboard and integrations will still use the Cryptolens name.
Cryptolens allows you to use Zapier to send expiration emails to customers when a license is about to expire. While we do have an in-house solution for this purpose, some of our customers want a bit more customization. Then, our Zapier action can be used, since you can perform other Zapier actions when a customer’s license is about to expire, or link it with your CRM.
This blog covers the basics of how to set up these emails in Zapier. We have also made a YouTube video covering this topic, and the full documentation page can be found here.
Using Zapier to Send Expiration Emails
1. Schedule by Zapier is used as the trigger. You can choose to trigger the event every hour, every day, or at other frequencies of your choosing.
2. The next step should be the Cryptolens action called “License Expiration Notification“. The configuration parameters are the Product ID, Days Left, and Exact Match:
The Product ID can be found on the product page in our dashboard. If you want all licenses that are about to expire in 30 days to be returned, you would simply set Days Left to 30. By setting Exact Match to True, only licenses that will expire in exactly 30 days will be returned. If Exact Match is set to False, licenses that will expire in >30 days will also be returned, such as 30 days, 29 days, 28 days, and so on.
3. Looping by Zapier is an important step since it takes the results from the Cryptolens action and creates line items. In the configuration tab, you need to extract all the fields you will use in later steps. For example, a good idea is to extract all of the emails, license keys, and expiry dates.
4. Filter by Zapier is an optional step that can be good to keep in mind. If some of your licenses are not attached to customers, the Email by Zapier step, or other steps you want to use, might not work properly. Then, the Filter by Zapier step can be used to mitigate those issues. You would simply create the following:
Only continue if -> Emails -> (Text) Contains -> @
This makes sure that any empty emails are filtered out, which could otherwise result in errors. The “Emails” part is the one you extracted in step 3, and the “@” sign is one way to mitigate the potential issues when performing your next step(s).
5. Emails by Zapier can now be used to customize the email’s recipient, subject, and body. This is where you would use some of the extractions from step 3, such as Emails (as the recipient), their individual license key string, the expiry date, and other values. Feel free to add more steps after this one for further customization!
Thank you for reading, please send an email to [email protected] if you have any questions!
Collecting user feedback is a crucial step when trying to improve your MVP. In today’s blog, we will cover how user feedback can turn your simple MVP into a product that is more optimal for future customers. Now, that is actually one of the last steps before you can truly call yourself a software startup entrepreneur and work toward your market launch. After that, only the sky is the limit!
For this blog, we have made the following video:
Collecting Customer Feedback
If you have read our last blog about developing a Minimum Viable Product, you will know that getting customer feedback to improve your software application is a crucial next step. As I stated in that blog, the purpose of an MVP is to make a hypothesis as to what basic features your target audience really wants to solve their problem. It is now time to validate that hypothesis!
The first step when collecting user feedback is to distribute the MVP to early users. You then need to set up ways to practically collect their feedback. The last step is to strategically improve your product in the ways they want.
1. Distributing the MVP to Early Users
Let’s tackle the first question, who should you give out your MVP to? Well, the best group to test your MVP is of course your target audience, which we helped you find in a previous post. However, it might not be super easy to get them to try your MVP without either knowing you first or getting something in return. I would personally say that doing both might just be the best way. You would then hang out in communities where your target audience is and see if anyone is interested in testing your MVP for free. However, I would also keep the door open if anyone wants something in return. You can then offer something like a gift card or a discounted price when your product reaches the market.
Great, but what about the actual distribution of the application? Well, that of course depends on what kind of application you are developing. For mobile apps, there are tools such as TestFlight or Firebase that can facilitate testing. For other application types, I would strongly suggest checking out a previous blog we have made regarding a software licensing solution. Then, you are able to send out your product’s code and hand out license keys to the users to make sure only they have access to it.
2. Collecting User Feedback in Practical Terms
Now to the second question, how do you collect their feedback in practical terms? I would suggest using a mix of surveys, in-app user behavior observations, and 1:1 conversations. Creating a survey is a great starting point because it forces you to come up with the most important questions to ask. This can easily be done for free using Google Forms, with a simple shareable link and insightful analytics data. You can also observe directly in your app how users utilize your basic features using tools such as Mixpanel or Amplitude. 1:1 conversations with the users will most likely give you the best input regarding what features you should implement next.
3. Improving the MVP Using Feedback
Now that you have their feedback written down, you have to structure that data to find what you need to prioritize. A simple categorization of “critical issues”, “suggested features”, and “nice-to-haves” is a great way to start. For example, performance issues or features not working properly should of course be addressed immediately. Additional features they suggest should be prioritized after the critical issues. For these, I would try to find what features are the most requested and see which of those are the easiest and quickest to develop and begin with those. Lastly, nice-to-haves are always good to keep in mind, but they are not likely to provide a lot of value this early in your journey. I would not focus on those at all for now.
Looking Ahead – Stay Ambitious
Great, so what’s next? All of the blogs we have made in this series have focused on the development phase of the software startup. We have looked at finding the problem to solve and the target audience. We have now recently covered how to build and improve an MVP that solves that particular problem for that particular target audience. If you have made it this far, the next step is where it really gets fun. It is now time to develop a go-to-market strategy and find your first actual customers. After that, the focus should be on scaling your newly created software startup.
However, if you have not gotten your MVP quite right just yet, or if you are stuck on an earlier step, there is no rush. The beauty of an MVP is that it is quite easy to start all over from scratch and try again. Even if you have made it this far in the series, the startup phase is really where most people fail!
That is why we are devoted to helping you along the way with more posts like this one. And regardless of whether you are aiming for the stars or just happy reaching the clouds, we at Cryptolens always aim to make your journey more fun, prosperous, and effortless.
How do you develop an MVP? How long does it take, and how much will it cost? All of those questions will be answered in today’s blog, but firstly, why should you develop an MVP? A minimum viable product, or MVP, is an early version of your software product that has just enough features to satisfy early users. The MVP has been the crucial beginning stage for many of today’s coolest and most successful companies such as Spotify, old-school Twitter, and Amazon.
Now, understanding these companies today may seem quite overwhelming. However, today’s blog will be much simpler than that since we will only focus on the beginning stage of their life – the MVP stage, so we can understand why it is so important to get right.
If you’d rather watch a video, we have made the following:
Why Develop an MVP?
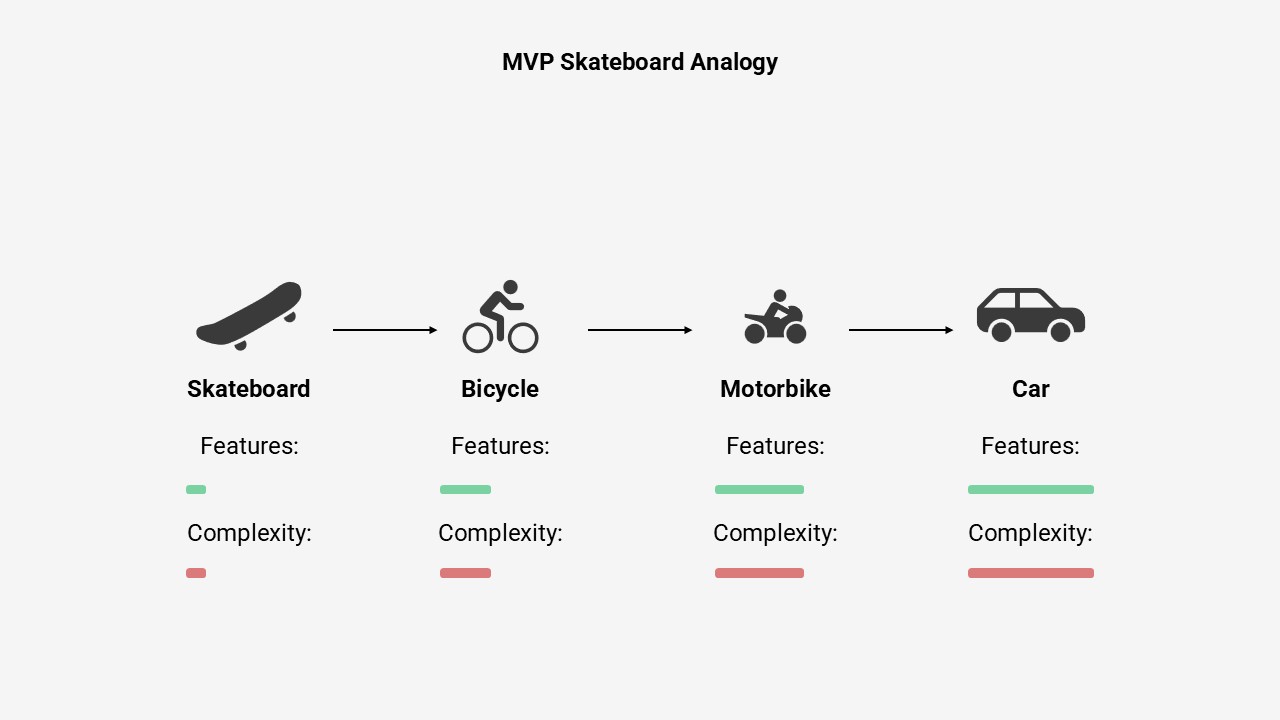
Now, first of all, why is an MVP the beginning step favored by so many successful startups? Well, because it is a low-risk, agile, and customer-centric solution. To explain that a bit further, a common analogy is that an MVP is like a skateboard. While not being perfect, it does solve a very clear problem, to get from point A to point B. A more optimal product to solve that problem would of course be a car. But just imagine the massive investment cost and time that it takes to create such a complex product! A skateboard is a lot simpler. It takes less time to develop and still enables you to gather customer feedback to quickly change the product according to the customer’s needs.
Improving the MVP
The MVP skateboard of course comes with some drawbacks. You will then have to change the product according to the customer’s wishes. For example, they may want to travel further in a bit more comfort. Then, you could develop a bicycle! After adjusting some more, that skateboard turns into a car. With each step in the way, the product becomes a bit more advanced in terms of features. It is also able to address the problem in more optimal ways. Sadly, it also becomes a lot more complex to develop.
Instead of trying to develop a car on day 1, focusing on the simplest way to solve the point A to point B problem would save you a lot of time and money. For that particular problem, the simplest product would be a skateboard. However, knowing exactly what basic features you need to develop for your MVP is not easy. It requires you to really understand the problem that your software application has to solve, and we have already made a blog post on that topic, which you can find here.
How to Develop an MVP
Now let’s focus on how to develop such an MVP in practice. Using the problem statement that we mentioned in the previous post, you should be able to create a hypothesis of what the basic features that customers really want look like. The purpose of an MVP is to validate that hypothesis in the quickest, cheapest, and simplest way.
Depending on your unique situation, you can choose different ways to implement the necessary software features. You could choose a low or no-code option, such as Bubble or Webflow, but you might also just have to code the features yourself from scratch.
Time and Money Costs of Developing an MVP
The cost of developing an MVP can vary significantly. You can expect it to cost a minimum of a few hundred dollars per month. Because many of the services you need are paid on a monthly basis, it is in your best interest to develop the MVP rather quickly. It can usually take from a few weeks to a few months to develop. Once again, focusing on the core functionality of the product really matters, both from a time and money perspective.
When the MVP is finished and you have the basic features working, you need to distribute the MVP to a selected few people and gather their feedback. This is a crucial step because it will determine how you need to alter and improve the product according to their wishes.
Then, it is all about going from a skateboard to a car, or from an MVP to Amazon, as I started off this post by saying. Distributing the MVP and getting customer feedback will be the focus of our next post.
Protecting and Licensing an MVP
Before that, you most likely need a way of protecting the MVP so that the users cannot copy the product and send it around to their friends uncontrollably. What you seek is a software licensing solution where you are able to lock your product and hand out license keys to selected users. Coding such a system yourself will take a lot of time, which kind of defeats the purpose of an MVP.
In those situations, Cryptolens is here to help. We are a Licensing as a Service (LaaS) provider that helps developers license and protect their MVP’s code. You can set up all of our advanced licensing features in an easy-to-use dashboard with implementation guides in your favorite programming language. But the best of all is that you can implement our software licensing solution for free, within minutes.
How do you find the target audience for your software application? In the early days of developing software, you need to clearly define who your product is aimed to serve. If you don’t, you will run the risk of trying to sell a product to the entire human race, and that is of course not easy nor cheap. But finding a target audience is not always easy either. For example, how should your application improve the emotions of your future customers? How, if at all, should it affect their social status?
The answers to those questions are quite intriguing and deeply rooted in human behavior. This blog will give you a framework to make the process of finding a target audience more effortless!
Here is a video we have made on this topic:
Finding the Target Audience for Software Applications
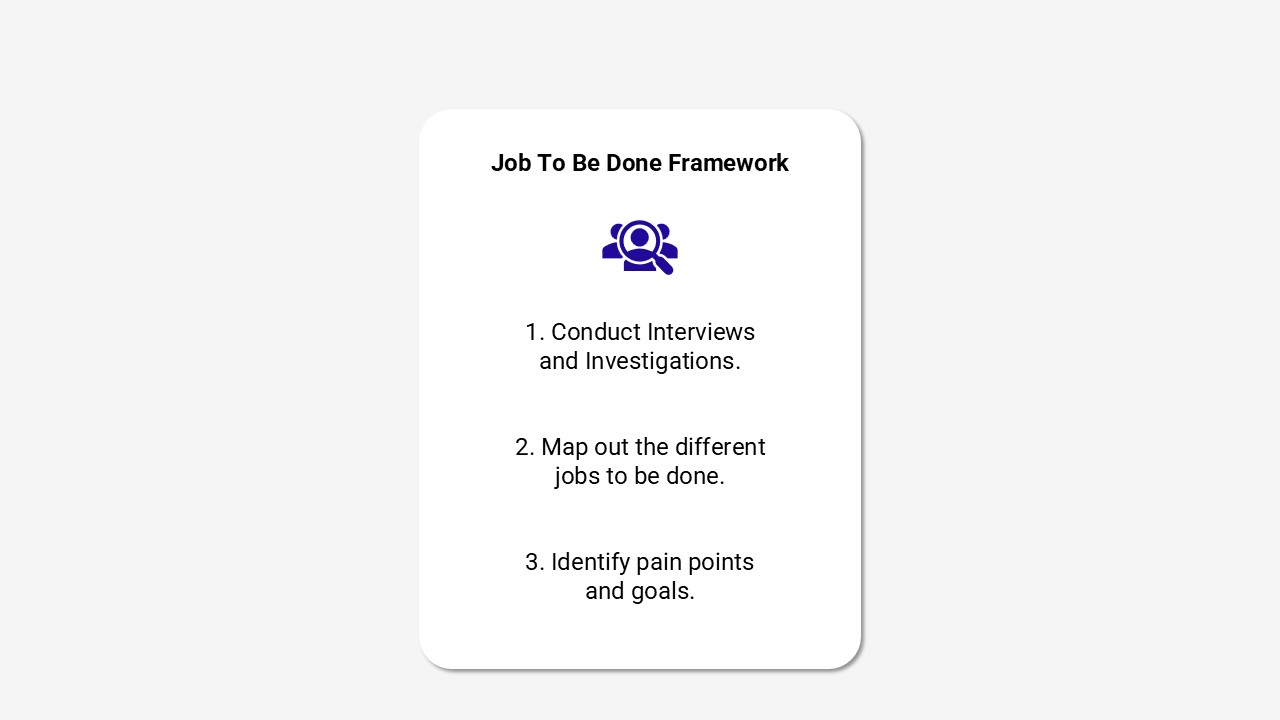
Now, in a previous blog, we have covered how to find and articulate the problem that your application is solving, which is important to understand before you try to find your target audience. The Job to Be Done Framework will be used in today’s blog. This framework is a great starting point because it shifts the focus from who the customer is to why that customer is buying your product.
Here are the steps. The first part is to conduct interviews or investigations to find out more about your potential customers. You can then map out three different jobs, a functional job, an emotional job, and a social job. We will get to what those jobs actually mean a bit later. The last step is to identify pain points for the target audience and find out what their goals are. Let’s now go through each one of those steps together!
1. Conduct Interviews and Investigations
The first step is all about getting the temperature of your future competitors’ target audience. Firstly, I would find out how people today are solving the problem we identified earlier, and thereby find who my future competitors would be. Then, I would try to learn more about their unique situation. For example, what are people saying about the competitors in Google Reviews? Are there any subreddits mentioning them, and do they have a community of their own where you can take information?
If you want, you can even reach out to the users and conduct interviews or surveys. However, simply observing them in communities is a good starting point. Either way, the purpose is to get a feel of the pain they are experiencing. As you will soon see, that becomes important for later steps.
2. Map out the Different Jobs To Be Done
2.1 The Functional Job
It is now time to cover the three different jobs to be done, the functional job, the emotional job, and the social job. The functional job to be done is usually pretty straightforward. It defines the functional problem that the product aims to solve. A car’s functional job is to take you from point A to point B. A restaurant’s functional job is to reduce your hunger. And to continue the example I used in the previous blog about the problem to solve, our Excel add-in had a clear functional job – to solve all Excel errors within seconds.
2.2 The Emotional Job
The functional job might be enough if we intend to sell our product to AI. However, human beings are a lot more complex than that. We have something called feelings, and the emotional job takes care of those.
A great software product should be able to put the user in a particular emotional state, such as calmness, happiness, or powerfulness. As we identified in the other blog, the time wasted when fixing Excel errors is the real impact of the problem, and what emotion is associated with wasting time? Well, stress, of course! By choosing a calming color for the add-in and empathizing calmness in your communication, you make sure that the emotional job gets done, which will make your customers happier and more loyal.
2.3 The Social Job
The last job to be done is the Social job. Human beings are not only emotional, but we are also desperate to fit into a particular social group. Why is that? Well, the reason is quite interesting and relates to the primal part of our brain.
Let’s quickly take us back to a time when human society was far less developed than today, and when we were living in caves like a pack animal. Belonging to the pack was then very crucial for survival. If a human was unable to fully show that they were a part of the pack, they would be kicked out of the cave and would most likely die alone in the wilderness.
In today’s world, belonging to a particular social group is still very important to us. That need can help explain peer pressure in a friend group, and also the marketing of software products. But what are some examples of modern-day social groups? Well, it all depends on who you want others to think you are. For example, some people really want to seem smart, others really want to seem kind, and some just want to tell the world how good they are at coding software applications. Either way, you need to find out how your target audience wants to be seen by others.
Our Excel add-in company could, for example, write on their website about how the add-in makes users seem more professional and efficient in the office. By tailoring your product and marketing communication to the social group that your target audience wants to belong to, you will make your product even more powerful. Why? Well, because then, you can then speak directly to the primal parts of your customer’s brain!
3. Identify Pain Points and Goals
Now lastly, by this point, you have most likely become a lot smarter. However, it is only when you use that wisdom in your code and in communications that the framework has any effect. But that is far from easy, so a great way to know where to prioritize is to state what your target audience really cares about. Then, you can assess how well competitors do those jobs to find where your product can fit in.
Indeed, selling to human beings can be complex, but in many ways, that just makes the process a lot more fun.
How do you generate license keys for a software application, and why are license keys important? Well, many software products simply cannot be sold unless you have a way to control who has access to the application, and that’s where a license key comes in. Today, I will give you an overview of license keys and explain how you can implement a license key solution for your software product.
You can also watch the YouTube video we have made on the same topic:
What are License Keys?
First of all, what do I mean when I say “license key”? In the most standard setup, companies give out a license key to customers upon successful payment. When they try to enter your software application, they will have to insert that license key in order to get access to the product. Non-customers can’t provide a valid license key and they will not be granted access.
If you have subscription payments set up, the license key should also be able to restrict access from people who did not pay their latest subscription fee or canceled their subscription. It now becomes clear that, without a software licensing solution, even non-customers who download your product can get access to it, and of course, no one would ever pay for such a product.
How to Generate License Keys for Software Applications
A license key generator is then a solution that is able to generate license keys. Partial key verification gives developers a simple way to generate license keys. With partial key verification, you would generate a subset of license keys and set up an algorithm that checks only a part of that license key and some of the information stored within. This method is a lightweight solution that still prevents unauthorized users from accessing the application.
However, the bad news is that the structure of the license keys that you generate will start to leak with time, and the system can be bypassed quite easily. So what’s the good news? There are better ways of implementing a license key solution that performs full key verification which is a lot more secure and gives you a lot more control.
Implementing a Secure Software License Solution
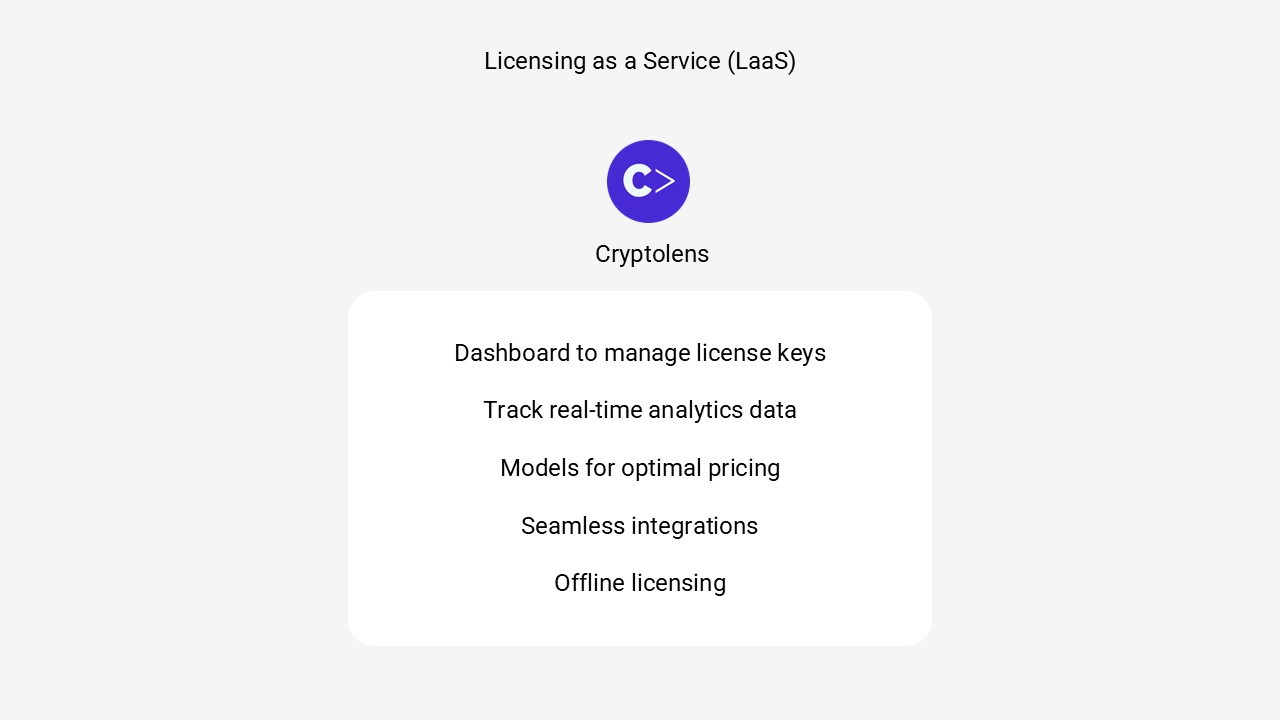
Now, you can code such a system yourself, but there are many benefits to outsourcing software licensing to a Licensing as a Service (LaaS) provider. Here are some of them: When you work with a LaaS provider such as Cryptolens, you get so much more value out of the system without having to spend the time developing it yourself. For example, you can easily create and manage license keys in our dashboard and review real-time analytics data regarding how customers are using your product.
You can also use our comprehensive documentation guides to set up different licensing models to make sure that you charge optimally for your product so that you do not miss out on any revenue. You can even set up licensing to work in an offline setting, and we have seamless integrations with leading third-party providers to make the entire process effortless to set up.
And the best of all? You have the ability to implement licensing for any software application in your favorite programming language with Cryptolens within minutes.
When you are a software developer wanting to sell your own software product, finding the problem to solve might sound easy, but in many instances, it really isn’t. Why do you need to understand the problem your application is solving? Well, because regardless of how well you code a product, no one will buy a solution to a problem that they do not have. However, simply knowing roughly what their problem is is not enough either because you might just turn your product into something that customers do not want. I will give you a few tools and frameworks to use in this blog so you can make sure that you develop a product that customers really want!
Make sure to also check out the video we made on this topic:
Finding the Problem to Solve
Let’s start off with an example. Let’s say that your prototype is an Excel add-in that checks for errors in an Excel document. Without looking too far into the problem, you might spend a lot of time developing a very advanced feature that gives a thorough description of why the error in a particular cell occurs. When you eventually begin to sell your product, you might be faced with rather depressing data. No one actually reads the advanced descriptions you worked so hard to code. Why is that? We’ll come to that part in the story a bit later, but the root cause is that you did not understand the problem early enough.
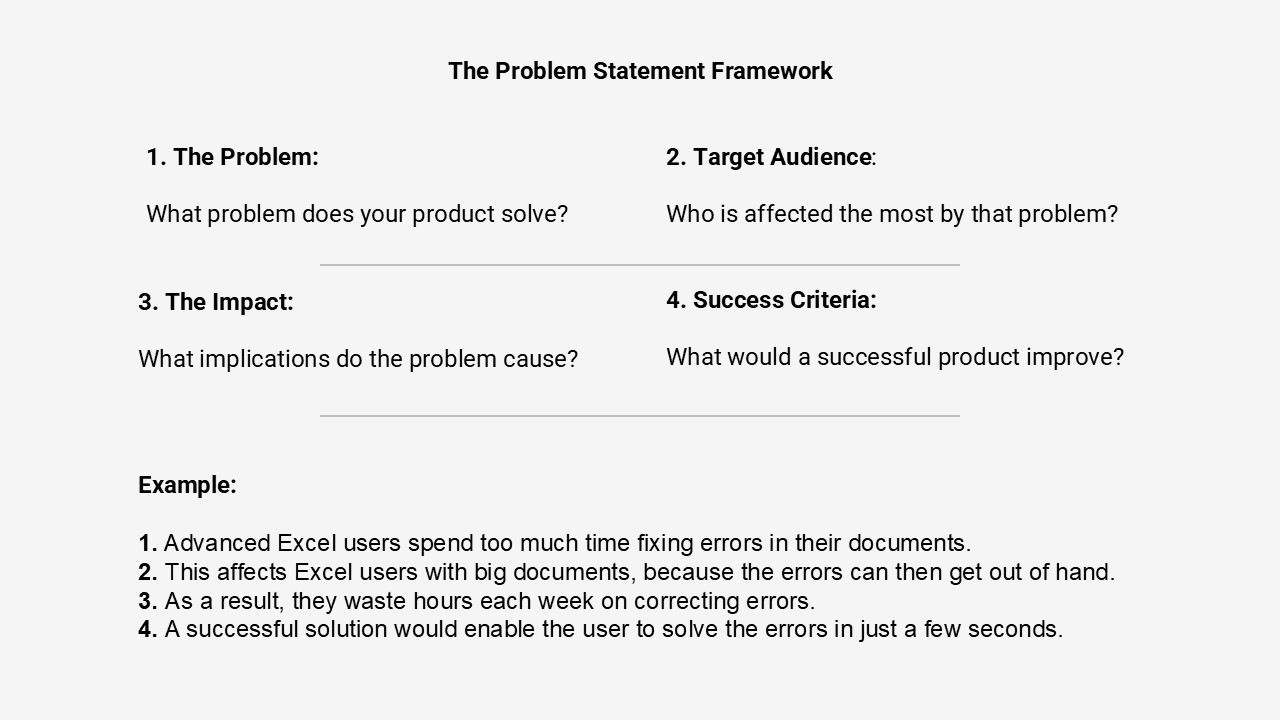
So how do you avoid ending up in a situation like that? Well, I would suggest using a simple framework called “The Problem Statement Framework”, because it forces you to clearly focus on a singular problem and helps you to put yourself in the customer’s shoes. The framework consists of 4 steps, and the output of this framework is usually a short paragraph that clearly states The Problem, Target Audience, Impact, and Success Criteria.
For our previous example, the paragraph would be as follows: “Advanced Excel users spend too much time fixing errors in their documents. This affects Excel users with big documents because the errors can then get out of hand. As a result, they waste hours each week on correcting errors. A successful solution would enable the user to solve the errors in just a few seconds.” Let’s now dig a bit deeper into each one of the steps together!
1. Fidning the Problem
The first step to finding the problem to solve relates to the problem itself. It is important to find the root cause of the issue. A handy method to make sure of that is to keep asking the question “why”. It looks something like this: Why do Excel users waste so much time? Because they have many errors to solve. Why do they have many errors to solve? Because they have big documents and do not check for typos. Why do they not check for typos? Because they create the documents under time pressure. You get the idea. So the underlying problem is then that advanced Excel users spend too much time fixing errors in their documents!
2. Finding the Target Audience
The next step is figuring out the target audience. This can be done by asking “Who is affected the most by this problem?” For us, Excel users who are under time pressure and create big documents are likely to get the most errors, and they would also highly value an add-in that can save them some of their precious time. For a more thorough guide on how to find your target audience, please read this blog.
3. Finding the Impact
Now actually, that just so happens to be the next step in the framework – the impact. After digging a bit deeper into the problem, we know that the errors themselves are not necessarily the biggest pain point for our future customers, but rather, it is the time it takes to fix them that is the impact. We have now come a long way to finding the problem to solve!
4. Finding the Success Criteria
The last step in the framework is to find what success would mean to these time-pressured Excel users. The success criteria is most likely a rather simple add-in that gives an overview of the errors and a quick button to fix them. As we have now found, time is indeed the root cause of the problem. Can that be the reason why our customers did not use our advanced descriptions feature that I mentioned earlier? It definitely could be, because they probably do not want to waste any time reading a long description, they just want to solve the error and move on to the next document.
My Personal Tips when Finding the Problem to Solve
Now that you know about the framework, I want to share some tips on what I would do next. I would first look at available data to make sure that the problem is there, and then I would define how a successful product would improve that data. Using our Excel add-in, I would try to find data regarding how much time an average person in my target audience wastes on checking errors. I would then try to estimate how much quicker my product should be able to make the error-checking process, but crucially, I would also try to turn that time into money.
For example, imagine being able to tell your future customers: “My addin can help you save thousands of dollars each year by reducing the time spent checking Excel errors”. Now that can be the foundation of a pretty good sales pitch. If you instead find that fixing your unique problem can only save an average company a few pennies, the problem might not be worth solving at all. I now hope that you know more about how to create a product that customers really want. The next steps are to further investigate your target audience, and then to build a Minimum Viable Product (MVP). The process is not easy, but together, we can make it a bit more effortless.
What is a cloud-based software licensing platform? In today’s fast-paced world, more and more products are moving to the cloud. And sure, there are many benefits with the cloud, such as increased accessibility, reduced infrastructure cost, and greater integration capabilities. But what about cloud-based licensing? Why are many companies moving from physical license keys to the cloud? In today’s blog, we will answer that question and show you how switching to a cloud-based software licensing platform can improve and modernize your business.
If you would rather watch a YouTube video on this topic, here’s one that we have made:
Cloud-Based Software Licensing Platform
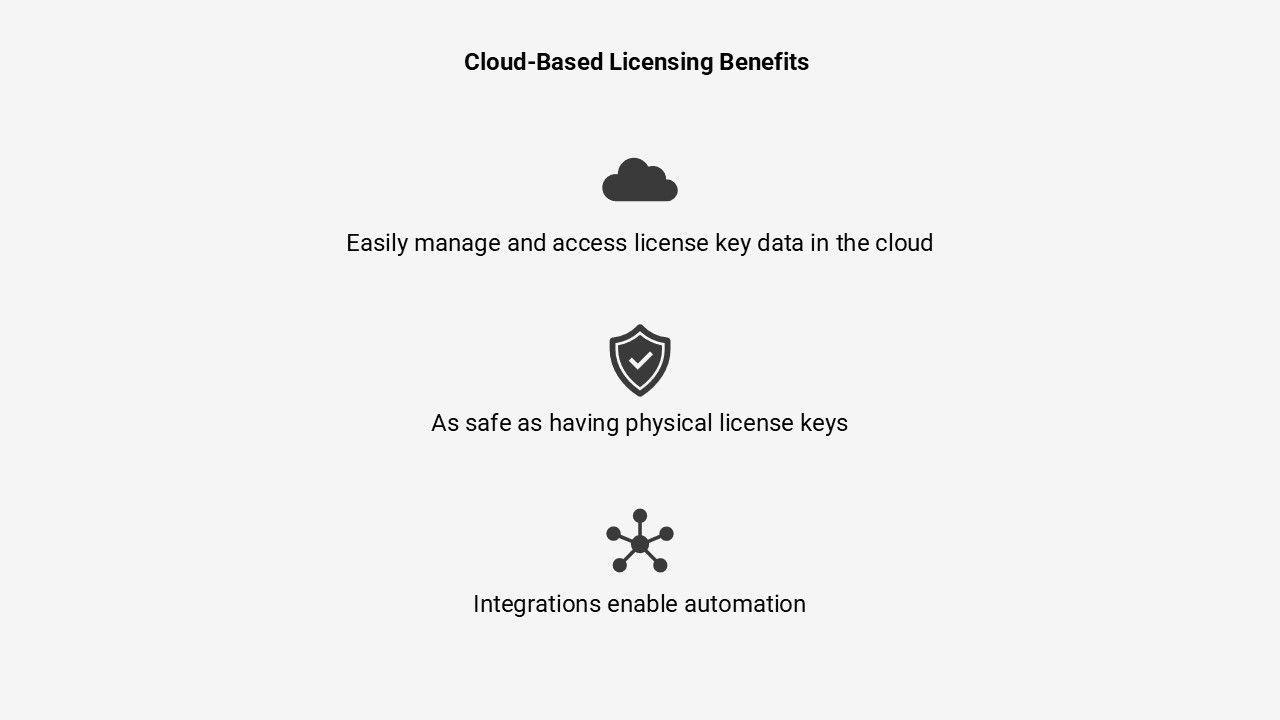
First of all, how does non-cloud-based licensing work? One old-school way is to sell a software application on a CD that comes with a license key string on a physical paper. The customer then has to insert the license key string into the application in order to access it. Another physical license key example would be licensing dongles. Software applications then comes with a USB stick which has to be inserted into the computer in order for the software product to be accessible. Neither of these methods feels modern, and keeping track of the physical keys quickly becomes a nightmare. Cloud-based licensing solves this problem!
A cloud-based software licensing platform is a place in the cloud, usually in a web browser. There, you can easily see all of your customer’s license keys, relevant information such as the expiry date, and analytics data regarding how the customer uses your product. So is this method as safe as having physical license keys? Yes, it still keeps the product from being copied and used by non-customers! You can even automate a lot of processes, such as payments, by integrating the platform with other third-party providers.
The cloud-based solution also gives you more flexibility when it comes to licensing models. Subscriptions, usage-based models, and floating or node-locked models are very easy to set up and manage in the cloud. Each model has its own benefits. In general, the different models give you the ability to price your software product more effectively. A powerful way to implement cloud-based licenses is to also implement a licensing model called account-based licensing. Then, all of a customer’s license keys are stored under a username and password. A customer can sign in with their usual user account, and they never have to worry about keeping track of their unique license key. The customer experience is so much smoother, and with cloud-based licensing, your company has a lot more control and flexibility to manage the license keys.
Implementing Cloud-Based Licensing
So if cloud-based licensing is so much better, how do you migrate to the cloud? Well, the easiest and most cost-effective way of doing so is to outsource software licensing to a Licensing as a Service (LaaS) provider. Then, you don’t need to invest a lot of time and money to code it and maintain it yourself, and you get a lot of integrations and advanced features from day 1. We have already made a blog post that tells you how to choose the best provider for your business. We also have a page about the process of migrating license keys to Cryptolens. I now hope you know more about cloud-based licensing, and why so many products in general are moving to the cloud.
An open-source license server is a great solution if you are selling a software product to customers who run the application in an offline setting, where software licensing is otherwise an issue. Given the lack of internet connection in, for example, air-gapped networks, your application will not be able to communicate with the software licensing system, and you will lose the ability to manage the licenses.
In today’s blog, I will briefly cover how the open-source license server by Cryptolens helps you out in those situations so you can implement software licensing in an offline setting. Please read our full implementation guide if you want to implement our license server.
We have also made a YouTube video for this blog:
Open-Source License Server
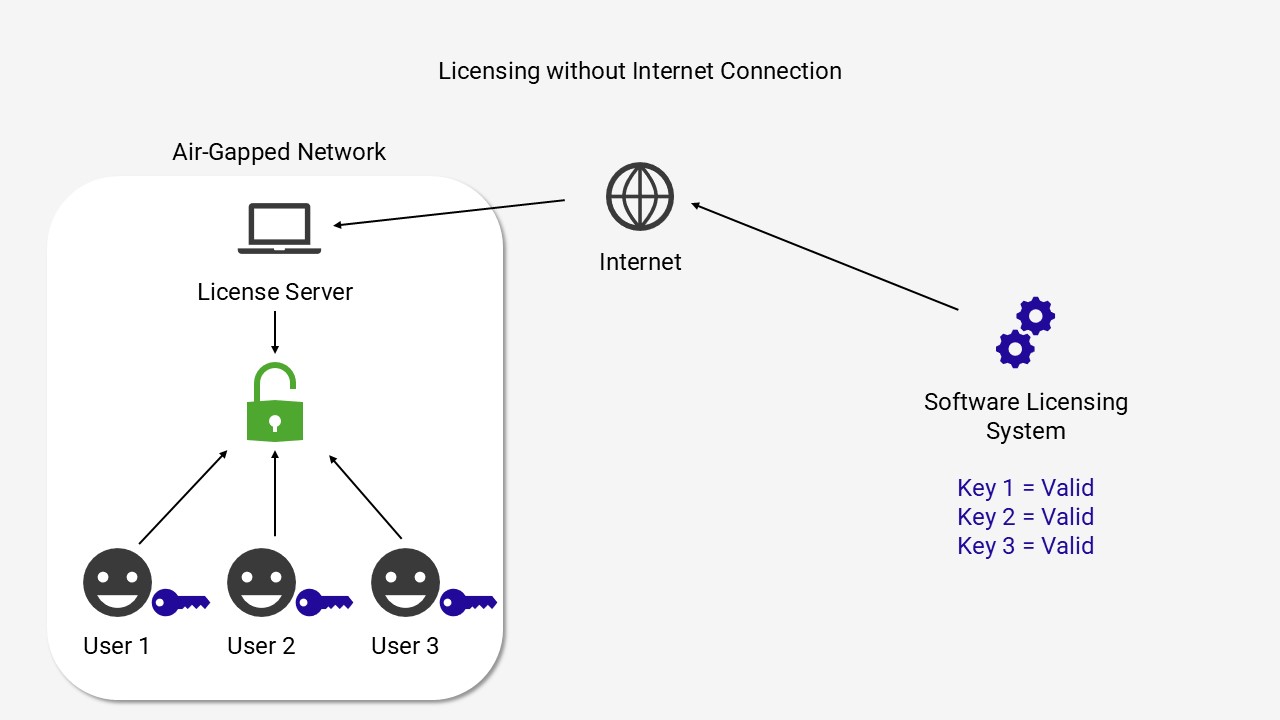
First of all, let’s dig a bit deeper into the problem. Whether you are using an internal software licensing system or working with a Licensing as a Service (LaaS) provider, you most likely need an internet connection to verify a customer’s license key. Then what happens if you want to sell offline applications?
Let’s take the example that you sell your application to a large enterprise. The 3 employees who will use the application are working in an air-gapped environment. When they run the application without internet access, the connection between the application and the software licensing system is lost. That means that the license files cannot be kept up to date.
This is where a license server from Cryptolens comes into the picture. One computer, which is called the license server, is allowed internet access. Then, we let the 3 machines that run the application contact that license server when performing license verification. It is then the license server that contacts the software licensing system. Key verification can now proceed as normal, and we can keep track of this customer’s licenses, even though they are running our application in an offline setting.
Cryptolens is a Licensing as a Service (LaaS) provider that offers a customizable license server to suit your unique licensing requirements. Our implementation guide and customer support make it effortless to set up offline licensing!
Stripe is a great service provider for setting up subscription payments and pricing plans for software products. However, integrating Stripe with a software licensing system makes it even better. Read this blog to learn more about how the integration can enable you to charge more effectively for your software products and reduce the time burden!
Alternatively, watch the following video we made:
Stripe Integration for Software Licensing Systems
When software developers want to sell their software products, Stripe is a perfect payment provider for setting up recurring payments. However, it is only when you combine Stripe payments with a software licensing system that you realize the full potential. But what do I mean by that?
A software licensing system works as the lock in your application that makes sure only customers get access to your product. They are given license keys, and the validity of their license key is checked by the software licensing system every time a customer tries to enter the product. If you set up recurring payments and different pricing plans with Stripe, you can integrate Stripe with a Licensing as a Service (LaaS) provider such as Cryptolens to ensure the correct customers always have access to the correct features within your product.
How the Integration Works
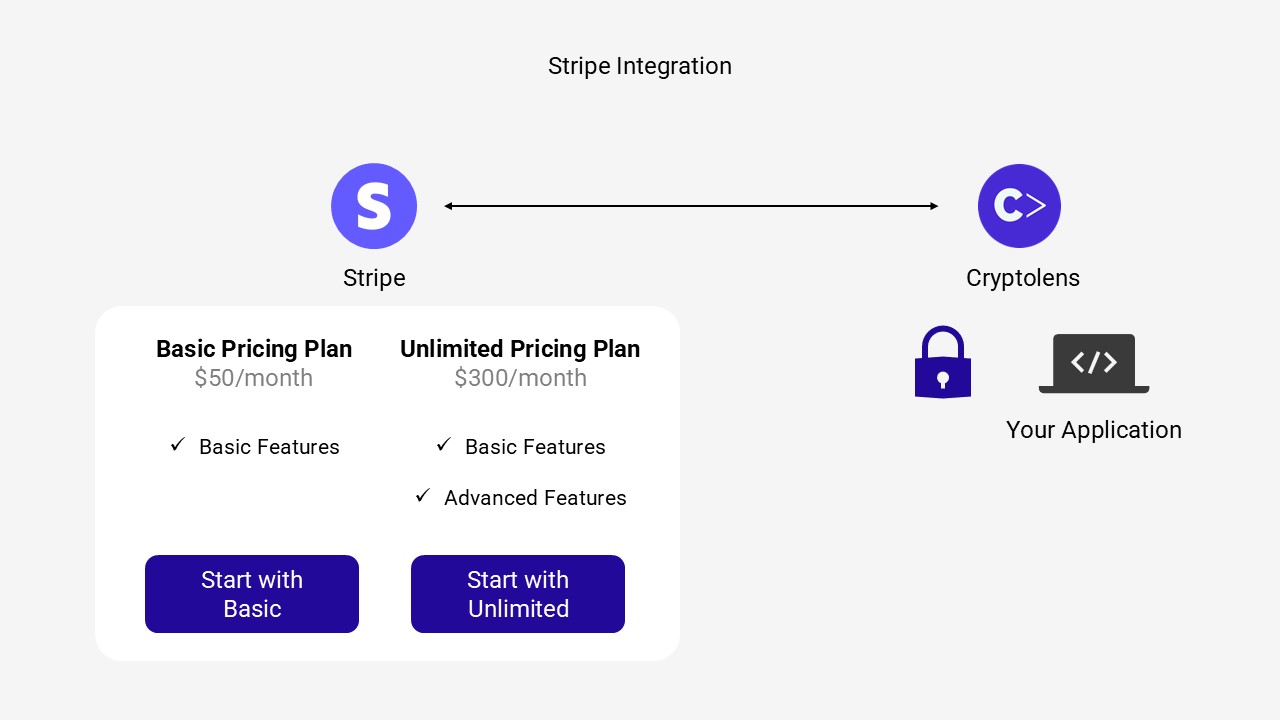
Webhooks in Stripe can facilitate communication between Stripe and the software licensing system to make sure the subscription status is correct for each license key. Let’s say this customer on the basic pricing tier tries to enter the product. The software licensing system checks the validity of their license key. Thanks to Stripe, the system knows that the customer has paid their latest subscription fee and will be allowed in. The system will only unlock the basic features to reflect the customer’s pricing plan.
If the customer would have had a subscription for the unlimited pricing tier, all features would be unlocked. That is how a Stripe integration can make recurring payments smoother, especially if you have different pricing plans.
Who Needs a Stripe Integration?
I would say that a Stripe integration is a key factor in making your business scalable. Manually creating license keys and blocking them as soon as a customer cancels their subscription works as long as you do not have that many customers to manage. When you do get a lot of customers, keeping track of all of them will be a big time burden. If you get it wrong, it could have big consequences for your customers!
Cryptolens helps you out in that situation with a seamless Stripe integration. To learn more, please check out our full implementation page for Stripe. This ensures that you allow for the fast growth you are working so hard to achieve.